Exporting Your Realm
Welcome to Designer’s Diary! Today we will be exploring the ins and outs of realm export.
Re-using your own material in other realms is something most of us want to do. Whether it’s running the same adventure for a second group of players, duplicating all your game rules for use in multiple realms, or simply sharing your creations with others, you’ll need to get the material out, and then back in again. This entry focuses on getting everything out of your realm.
In most cases, you’ll want to pull everything out from a given realm so you can re-use it all. When you export everything, Realm Works simplifies the process and allows you to skip over lots of optional steps to make everything quick and painless. So let’s take a look at how this all works!
Six-Click Export
The walk-through below includes a fair bit of context for doing more than just a quick export. If you simply want to generate an export file as quickly as possible, it can be achieved in just a few steps.
- 1. Click on the Share menu to show the ribbon bar.
- 2. Click the Manage Exports button.
- 3. Click the Save button, if necessary, within the Manage Exports form to create the definition and be able to trigger the export.
- 4. Click the Full Export button to generate an export file that you can re-import, which brings up the Full Export form.
- 5. Click the Export button at the bottom of the Full Export form.
- 6. Click the Save button to begin generating the export file.
The Share Ribbon
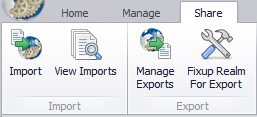
Everything to do with export and import is managed via the Share menu and ribbon bar. At the top of the main window, click on the Share menu item and the corresponding ribbon bar appears. On this ribbon bar, you’ll see a “Manage Exports” button. Clicking this button opens a form where you can configure and perform the export.
Manage Exports Form
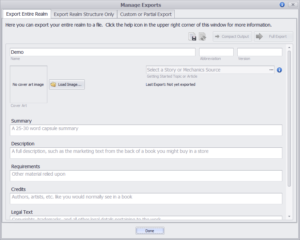
At the top of the Manage Exports form, you’ll see three different tabs. You can export the entire realm, export only the realm structure, or carefully define exactly what subset of your realm you want to export. We’re going to export the entire realm, so the initial tab is what we want. For more details on the different export options, you can click on the blue “info” button in the upper right corner of the form (next to the “X” button that closes the form).
 On the “Export Entire Realm” tab, you’ll see a field for the name of the export and a whole bunch of additional fields that you can fill in. When exporting content for subsequent import back into your own realms, you can safely ignore everything other than the name, which defaults to the name of the realm. If you plan on saving and re-using your exported material, however, you’ll probably want to enter some additional details. If you plan to share your creations with others, the remaining fields will typically be something you want to fill in as well. The purpose and value of the other fields is explored in a separate diary entry, and they aren’t important to this walk-through, so we’ll just leave everything blank right now (aside from the name, of course).
In the upper right, above all the fields, you’ll see a “Save” button and two greyed out buttons labeled “Compact Output” and “Full Export”. We need to save the export definition before we can actually export anything. Since using the name of the realm for the export works fine, all we need to do is click on the “Save” button. Once we do that, the “Compact Output” and “Full Export” buttons become enabled.
Now we need to decide whether to do a compact or full export, which is easy. If you plan on importing the material back into Realm Works, a full export is required, since a full export includes all the nitty gritty details that Realm Works needs to bring the material into another realm. Compact output is designed for users who want to make use of their material in other products outside of Realm Works. We want to be able to re-use our realm’s contents in another realm, so we need to click the “Full Export” button.
Full Export
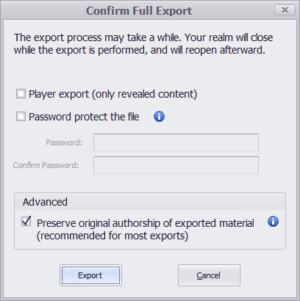
 At this point, a new form appears where we can decide various aspects of how our export file should be created. You’ll see an option to generate a “Player export”, which restricts the material to only that which you’ve revealed. As the name implies, this restriction is intended for when you want to give the export file to your players. A second option allows you to protect the export file with a password, with the blue “info” button next to the option offering some guidance on how it works and when you might want to use password protection. At the bottom is an advanced option regarding authorship control that most users can completely ignore (you usually want it enabled). As you can see, if you simply want to re-import the material into another realm, the defaults are typically going to be exactly what you want. So click the “Export” button at the bottom to proceed with the export.
The final step is choosing a file in which to save the export. A standard Windows “Save File” form appears, where you can navigate to the folder in which you want to save the export file and enter the filename you want to use.
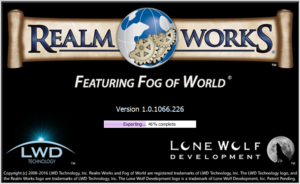
 Once you specify the file, the export process begins. The export process needs to extract your entire realm from the database, including all your images, and write them out to the export file. Consequently, the operation may take anywhere from a few seconds to an hour or more, depending entirely on how big your realm is. While the export is underway, the Realm Works main window disappears, and you’re instead presented with a progress report. Once the export completes, the main window reappears and your export file is ready to use.
We’ve done it! We’ve exported a realm and can now continue on our adventure.

